Showing posts with label Rhinestones. Show all posts

Thursday, July 28, 2011

I scream you scream, we all scream for....

Icecream. I love these sets, I know they are old, but I think they are super fun. I routinely use them for kids birthdays, and it's a good reminder that when you see a set you like, get it, before it retires.


Stamps: Birthday Bliss, On a Pedastle
Inks: Rose Red, Chocolate Chip, Bermuda Bay
Paper: Rose Red, Chocolate Chip, Whisper White, Sweet Pea DSP (retired)
Misc: Hodgepodge Hardware, 1/4" old Olive Grosgrain Ribbon, Rhinestones, Dimensionals

I'm going to leave this as a short post, that way I might actually get more posting done this month.


Friday, December 24, 2010

Have a Holly Jolly Christmas

First off I want to apologize for not posting anything the last while. We were insane trying to get everything ready for our Christmas Vacation, and then we were on the road for 2 days, then spent 5 days and we were on the road again for 18 hours. We finally arrived in Logan Utah this morning and have had a great day with family here. We will be leaving again tomorrow around noon for another 14 hours of driving before we end up in Mesa.

Before we left I made a card (a huge card) for Sevastian's Kindergarten class to sign. It ended up being 6x9, and the focal point on the card was 4x5.5. I took it into class for the class party and had all the kids sign it before we tucked the gift card for the teacher and gave it to her at the end of the party.

I love this set, and think it is a great kids set. I also decided to go a little over the top with it, and put shimmer everywhere. There is Dazzlin' Diamonds Glitter pretty much everywhere on the card. I also used Vanilla Smooch Spray to spray the background Bashful Blue piece after I embossed it with the Petals a Plenty embossing folder, and then I used Frost White Shimmer Paint to emboss the top of the petals and topped it off with 3 small Basic Pearls. I also added Rhinestones to the top of several trees.


It's late here, and I am working on almost no sleep, so I'll come back and post the recipes later.

Hope you all have a wonderful Christmas, and an even better time with family.


Sunday, December 12, 2010

Oh Christmas Tree....

I love Christmas trees, they look so pretty, and the real ones smell so nice too. I have tons of Christmas stamps that have trees in them too. I actually cased myself with this card. Last year I stamped Dasher where I stamped this tree. I think the Snow Swirled Tree looks amazing with the retired Bride Specialty paper. I used my brayer to ink over the paper with Elegant Eggplant ink, and then took a tissue and wiped the ink off to reveal the white swirls. The rhinestones are the perfect touch to finish this card off.


Stamps: Many Merry Messages, Snow Swirled
Inks: Elegant Eggplant
Papers: Brushed Silver, Elegant Eggplant, Whisper White, Bride DSP (retired)
Misc: Large Oval Punch, Scallop Oval Punch, Elegant Eggplant Rick Rack (retired), Brayer, Rhinestones


Sunday, November 28, 2010

CAS Seasons Greetings

I have a hard time doing CAS (clean and simple) cards for some reason, but this one pretty much can only be called CAS. It's hard to tell, but the Pacific Point is actually layered onto Whisper White cardstock. All I did for this one was emboss the card front with the Norther Flurry Embossing Folder, and then go over it with a bit of Whisper White ink, add a couple Rhinestones and a greeting and Voila, done.

Stamps: Many Merry Messages
Inks: Whisper White
Papers: Whisper White, Pacific Point
Misc: Rhinestones, Northern Flurry Embossing Folder

I actually managed to get the Christmas Tree up tonight. I offered to take my sister in laws kids for a sleep over, and they had so much fun putting up the tree at their house that we did it here too. It was awesome. I barely had to do anything, except the top part of the tree, since none of them could reach it. Hubby was thrilled that all he had to do was get the tree down, plug in one cord, and put the topper on (that's tradition around here). We are making homemade tortillas and scrambled eggs in the am for breakfast, so I'd best be going to bed. I need to be up early with this many kids in the house.


Thursday, November 25, 2010

Many Merry Christmas'

One of my all time favorite Christmas stamps is called Many Merry Messages. It is fantastic for both the outside and inside of any Christmas card. I use it at pretty much every Christmas SAS I do and most club nights that have anything to do with Christmas too. The rest of this card uses the new Northern Flurry embossing folder and the Level 1 hostess set from the current mini. If you like these stamps you need to host a qualifying workshop or party before Jan 3rd. I still have a few dates available, so contact me today.


Stamps: Many Merry Messages, Northern Hearts
Inks: Pacific Point, Crushed Concord, Whisper White
Papers: Whisper White, Pacific Point, Crushed Concord
Misc: Northern Flurry Embossing Folder, Rhinestones, Sponges, Dimensionals, Rhinestone Brads

I'm not sure you can see it real well in the photos, but the ribbon of paper with the saying Merry Christmas is actually curved outwards, and does not lay flat. I love the look it gives the card.


Wednesday, November 24, 2010

Shimmer snowflake

My mom reminded me of a card I made last year, and I went looking for it and could not find it on my blog, so I made a new one up using this years colors, and tweaked it a little bit. I absolutely love the Shimmer Paint from Stampin' Up! You can use it for so many things, but the easiest way to use it is to simply put it on your stamps and stamp with it. That is what I did here. I used Markers to ink up most of the stamp and then used a sponge dauber to put the Platinum Shimmer Paint where I did not color. This card is so shimmery and pretty in real life, it looks nice in the photographs, but no where near as awesome. If you are ever trying to figure out what could make your card stand out just a little more, use some shimmer paint on it.


Stamps: Serene Snowflakes, Four The Holidays
Inks: Pacific Point
Papers: Whisper White, Pacific Point, Night of Navy
Misc: Platinum Shimmer Paint, Sponge Daubers, Filigree Brads, Rhinestones, Rhinestone Brads, Silver Elastic Cord (retired) Dimensionals


Tuesday, November 23, 2010

Northern Flurry...

Sadly that about sums up our weather lately.... cold and snowy!! I am really not a winter type of gal.... I think that snow is the worst of the 4 letter words, and about this time every year I wonder why we live in a place that gets winter for 6 months at least every year. I really do want to move somewhere (someday) that only has 1 season.... warm! The only good thing about snow and winter is that is makes for really pretty cards. If we never had snow, we would not have snowflakes to stamp and emboss onto cards, and that would be a shame. I was playing around with the Tags til Christmas stamp set the other day and made several cards with it, and then I decided to see what it looked like paired with this new embossing folder. I really do like how it turned out. Sometimes when you are just playing around with no particular idea in mind you end up with surprising results, and this time the surprise was a nice one.


Stamps: Tags Til Christmas
Inks: Real Red, Old Olive, Whisper White
Papers: Sahara Sand, Whisper White, Real Red, Old Olive
Misc: 1/4" Real Red Grosgrain Ribbon, Sponges, Decorative Label Punch, Northern Flurry Textured Impressions Embossing Folder, Basic Rhinestones


Tuesday, October 19, 2010

Decked out with Tinsel

The new Tinsel Trim from the current Holiday Mini is FANTASTIC!! You can use it for so many things, and hanging the ornaments is just one of them. In case you missed one of my earlier posts, I LOVE the new Jewels too! both the rhinestones and the pearls. They add the perfect touch to any project and are cheap too!


Stamps: Delightful Decorations, Snow Swirled
Inks: Old Olive, Cherry Cobbler, Early Espresso
Papers: Old Olive, Cherry Cobbler, Very Vanilla, Jolly Holiday DSP
Misc: Silver Tinsel Trim, Ornament Punch, Rhinestones, Boho Blossoms Punch, Eyelet Border Punch, Petals-a-Plenty Embossing Folder, Stampin' Dimensionals


Sunday, September 5, 2010

happy happy happy

My cousin got married a year ago, almost to the day and I made her a cute little card and a little photo gift (which I will show you later). I love using people's wedding colors to go their anniversary cards. Hers were red and black. I also cased this card from Kathleen H on SCS, and changed all the colors and a little of the layout. I used the direct to paper technique to make the background black and silver. I took brushed silver cardstock and embossed it then flipped it over and took the Basic Black ink pad and wiped it across the surface of the card. I also used Stampin' Ups! new Rhinestones for the middle of a few of the dots as well as the butterfly.


Stamps: Teeny Tiny Wishes
Inks: Basic Black, Versa Mark
Papers: Real Red, Basic Black, Brushed Silver, Whisper White
Misc: Black Embossing Powder, Filigree Embossing Folder, Basic Jewels Rhinestones, Beautiful Wings Embosslits Die, Scallop Trim Border Punch

I will show you the mini photo album tomorrow.


Sunday, July 18, 2010

new neighbours

Today has been a busy day, as has this last few days. I have been baking and trying new things, and today made homemade tortilla shells. They are really good, and my son loves them. Sadly my old and very abused rolling pin died while making them so I am now on the hunt for a 12-15 inch marble rolling pin, which I am noticing don't exist. SO if you know where I can buy one I, and ship to Canada, I will gladly send you a free stamp set from my retired for sale stamps. I should note my old one was not marble, but some weird plastic fiberglass thing and it was 12 inches, which for what I use it for is almost too small, hence the 15 inch wish list. I have also been making a lot of homemade white bread, and would love to try whole wheat, so if you have a great recipe for that I'd love it if you would share it with me.

We also got new neighbours recently, and I wanted to make them a card. I saw a very similar card done on SCS by KIM L, and wanted to case it. I do not have the good neighbors stamp set, but the paper stack from SAB has these cute houses and trees and clouds, so I paper pieced instead of stamping.


Stamps: Well Scripted (retired)
Inks: Chocolate Chip
Paper: Chocolate Chip, Whisper White, SAB paper stack, Baja Breeze
Misc: Rhinestones, Beautiful Wings Embosslits Die, Stampin' Dimensionals, Rub Ons (Eggcellent Eggs Kit), 5/8" Chocolate Chip Satin Ribbon


Wednesday, June 30, 2010

Beautiful Hydrangea.... take 3

I finally got some time to get this last card posted. I am totally in love with this set. I have only been coloring it in the 2 colors for these 3 cards, but I have plans to do this up with so many more colors!! I really hope you all love it as much as I do, since you will be seeing it a lot over the next year.


Stamps: Because I Care
Inks: Marina Mist, Concord Crush, Wild Wasabi
Paper: Concord Crush, Wild Wasabi, Marina Mist, Watercolor Paper
Misc: Rhinestones (eggcellent eggs kit), Aqua Pen, Rhinestone Brads, Stampin' Dimensionals, Finial Press Textured Impressions Folder, Sponge Daubers,

I am totally exhausted from teaching classes this past weekend, so I am off to bed. I want to thank everyone who came to my classes. I will have the rest of the pics up under the classes tab soon along with instructions. I am also going to be adding a few other classes later this summer so keep an eye out. If anyone is interested in long distance classes, please let me know by email and I will let you know how that works.


Friday, June 18, 2010

Again????

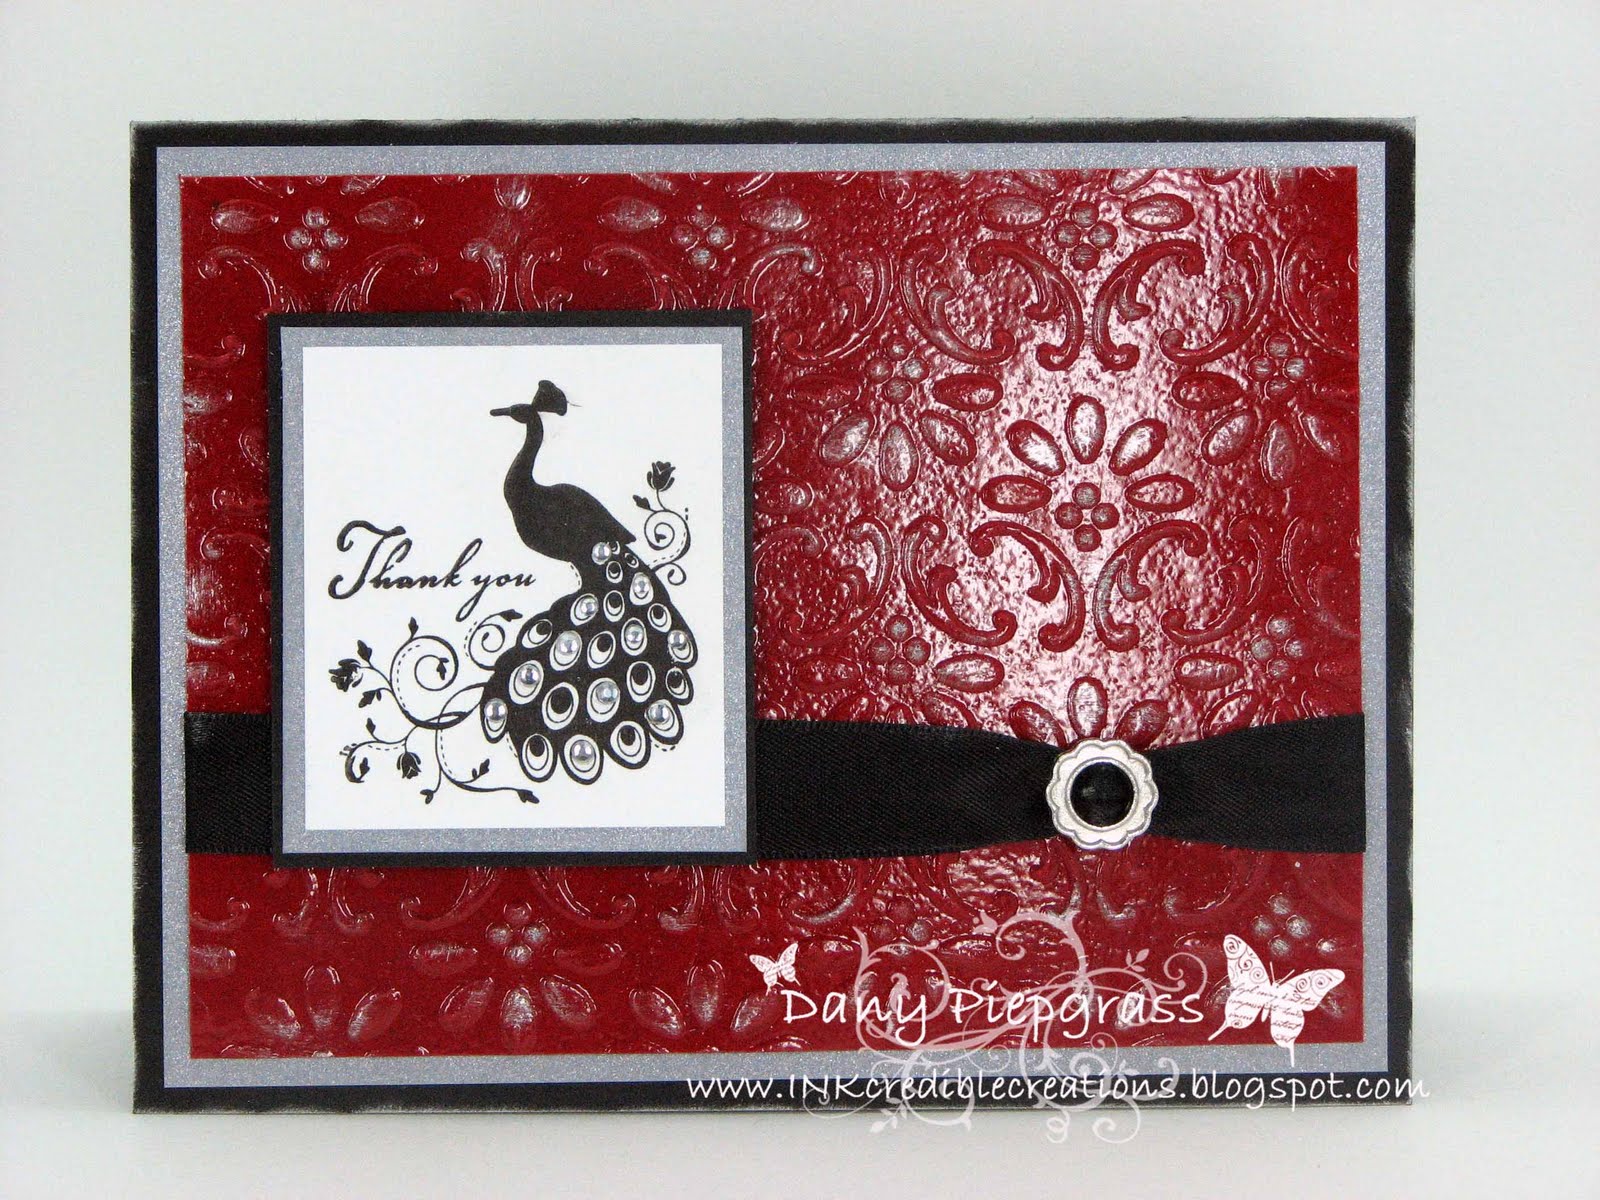
I know that is what you are all saying right now.... and I promise you that this is the last card made with this set for a while, probably a long while. I really am going to miss this set. I call this my triple embossed card. It is firstly heat embossed with clear embossing powder, then embossed using the big shot and the texturz folder finial press, and finally dry embossed over that with platinum shimmer paint.

I will warn you if you try this, that when you heat emboss first, then run it through the big shot, the embossing will crack and distress (which looks really cool). If you do not want the distressed look all you need to do is re-heat the powder. It will melt again and look all shinny and pretty like this card.


Stamps: Very Thankful
Inks: Basic Black, Versamark
Papers: Real Red, Whisper White, Basic Black, Brushed Silver
Misc: Platinum Shimmer Paint, Sponge Daubers, Rhinestones (from the Eggcellent Eggs Kit), 5/8" Basic Black Satin Ribbon, Ribbon Slide (Hodgepodge Hardware), Clear Embossing Powder, Final Press Texturz Folder

I think that is everything. It really is a very easy card to make, and looks stunning in person. I got my sneak peak order in, and will have a few really cool samples up in a day or two to tease you all with.